You may be an Android user, looking for an effective way to retain at least 10% battery juice at the end of the day. Just like what happened to me, some typical battery saver apps might have fooled you as well. And even after following some tips to boost battery life you are not getting good results. That’s why I am here with this article to introduce you to a functional application.
Decrease Screen Brightness Below Minimum Level on Android with Pixel Filter App
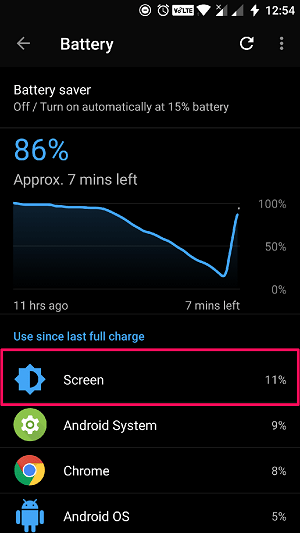
Do you have a habit of checking the battery usage on your Android smartphone? If you don’t have it, I recommend you do it often. You will have an idea of what makes the battery juice ooze out. On most of the smartphones, the screen takes up too much power. Given below is a battery usage chart taken from my phone. You can clearly see what uses the battery the most.
Obviously, what I did was finding an efficient app to reduce the power consumption of my display. I knew those overall battery savers wouldn’t help here. Guess what? I found an app named Pixel Filter. It disables some pixels on your screen. As a result, decrease in screen brightness below minimum level. Let’s have a look at the installation and configuration of the app.
You have to install the app first. Search for Pixel Filter on the Play Store or just click the link to reach the installation page.
Once you finish with the installation, you can open the app. Surprisingly, you won’t get any interface here. Instead, you can sense the brightness decrement.
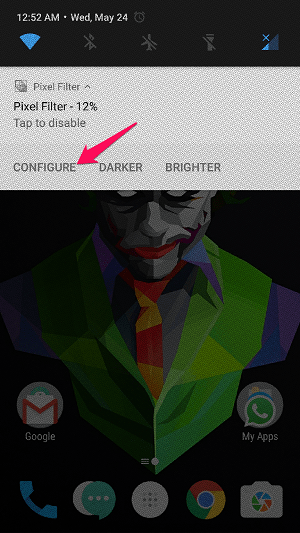
In order to configure the app settings, you need to pull down the notification panel and hit the Configure option under the entry you see there.
At this step, you will have the following options on the screen. Let me help you understand all those.
Enable Filter: Of course, you need to check this option to make the app work for you. Pixel Pattern: Here, you select the pixel deactivation pattern. By default, they give you seven options (my choice is 88%). You can also fiddle with the custom ones too. Bear in mind that the more number of deactivated pixels means the lesser level of details and brightness (and of course low power consumption). To Prevent Pixels Burn-in Shift Pattern Each: Don’t worry about it. This one determines the duration a particular pattern stays active. If you choose 5 minutes here, it will alter the pattern every five minutes. Hide Notification from Status Bar: With this option turned on, you will have no notification icon (but yeah, the notification entry stays there and you can see it by dragging your finger down). Watch Light Level: We know the screen should be bright in good lighting condition. So, you can turn this on to get the app manually disabled under bright light. Another option is available beneath to sense the current lighting level and make it a criterion. Turn off Key Backlight on Samsung Phones: As the option, itself says, your Samsung device’s physical key backlights won’t work when you check this option (my device is OnePlus 3, and I didn’t get this to work. So, it may only work with Samsung phones). I prefer keeping Pixel Filter enabled almost every time. Whenever I want a bright screen, I tap the app icon or the notification entry. Trust me, you will see a significant improvement in power consumption as you start using this app. Caution: You may have to turn Pixel Filter off to get the best screenshots. Have a look at the first screenshot, which I took with the app enabled.
Wrapping Up
The bottom line is simple. Pixel Filter does save battery life by reducing the screen brightness below the minimum level and I am happy to recommend it to you. What are you waiting for? Just install and try it now.


![]()