The majority of smartphone users are familiar with what QR codes are and how you can use them. Others, stay away from them thinking that it’s something extremely complicated. QR Codes are not complicated at all and are very useful. You can either use them to go to a web page or to where you can download an app. To be able to read them, you’re going to need an app that can identify them and scan them. Keep reading, and you see how you can create as many QR codes as you want and even make it as big as you want to. After that, you’ll be the QR King or Queen amongst your friends. If you want, you can even tease them how difficult it was to create it, when it was the complete opposite.
Create QR Code In Microsoft Word
One of the many good things about this add-in is that it won’t take you very long to create your QR Code. You also be happy to know that add-in you’re going to be using is compatible with:
1 Create QR Code In Microsoft Word1.1 Where to Download QR4Office1.2 How to Add Color To Your QR Code1.3 Final Thoughts
The jewel that is going to make everything happen for us is QR4Office. It’s an app that is easy to use, and it works like an MS Word add-in, and it will always be there waiting for you in the INSERT menu of Microsoft Word. You’re also going to be able to modify things such as changing the foreground and background color in your very own QR code. That way you can give it your personal touch. There’s also the possibility of seeing a preview of what your QR code is going to look like, so you can make any changes before the final version is created. Also Read: How to Embed Video in PowerPoint and Word
Where to Download QR4Office
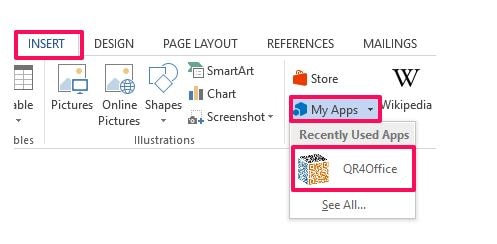
Let’s create your QR Code. First, you’ll need to download QR4Office from this link. Or, if you prefer you can also install it from Microsoft Word by going to Insert > My Apps > Store and look for it there. Once you’ve installed QR4Office, you can access it by going to INSERT and then in the drop-down menu from My Apps choose the app. At the top, you can enter the URL you want the QR code to have, and you can also choose http:// or https://. You can choose only to add a text to your code if you want to, there’s no obligation to add a URL.
Below the colors you’re going to see a slider with the word Size on the left side. Use that slider to make the QR Code as big or as small as you want. Also Read: Cool Internet And Computer Tricks
How to Add Color To Your QR Code
Once you have the text or the URL all set up, it’s time to customize the foreground and background. In the options section, you’re going to see two options: Colors and Background. The background option has an upside down pyramid. Click on that and choose the color you want the background to have. I’m sure you’re going to find a color that you’re going to be happy with.
The other option, Color, is to choose what color you want the foreground to have. Adding the QR Code in the Editor window click on the INSERT button from the interface. Once you’ve done this, the QR Code is going to be added as an image. Once you’ve completed the previous steps, you’re ready to send the QR code to our family and friends. If they want to know what’s inside, they’re going to have to use a QR Code scanner app. If you want to send your recently created to a particular folder, you can. All you have to do is right-click on any generated QR Code and after choose Save As Picture menu option. Don’t forget that the add-in QR4Office is only going to work if you have Microsoft Word 2013 or later. So, make sure you’re using at least that versions and if you’re not, looks like it’s time for an upgrade.
Final Thoughts
I told you that creating your very own QR Code is easier that it sounds. I bet you were expecting a difficult to use software with instructions that sound as if they were written in another language. Now that you know how the codes are done, you won’t be able to stop making them. Do you think that you’ll give the app a try? Let me know in the comments.


