If you don’t know the RAM frequency of your system or how to check it, whether Windows or macOS, then we are here to help you with that. Here are steps and methods that you can follow in order to check RAM frequency of your Windows PC and Mac. So without any delay, let’s head towards the methods. Here’s the most popular way to do it:
How To Check Ram Frequency With Wmic And Systeminfo Commands In CMD
Now, let’s dive into the detailed steps with screenshots and also check another way to do it.
1 How To Check Ram Frequency With Wmic And Systeminfo Commands In CMD2 Check RAM Frequency On Windows Using Two Ways2.1 Method 1: Check RAM Speed Using Command Prompt2.2 Method 2: Task Manager3 Check RAM And Its Speed On macOS3.1 Main Method3.2 Get More Info4 Wrapping Up
Check RAM Frequency On Windows Using Two Ways
You can check your system RAM frequency using two methods. One is using Command Prompt (as we already mentioned above) and another using the Task Manager. Both the methods will work on all the versions of Windows including Windows 10 and lower versions.
Method 1: Check RAM Speed Using Command Prompt
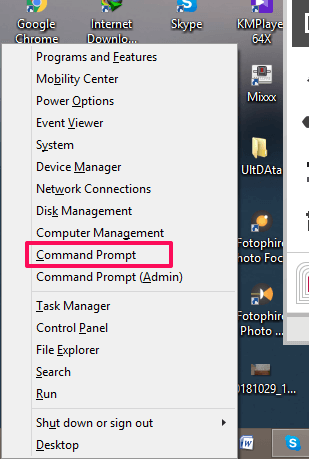
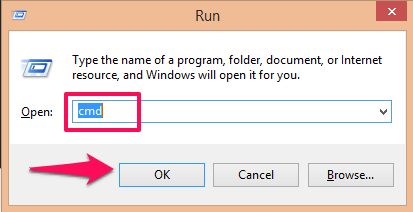
- Open the Command Prompt on your system. You can do so by pressing Windows+X key and from the menu select Command Prompt. Or by using Run. Open the Run program by pressing Windows+R keys together and then type cmd and hit enter or press OK. The cmd command will open Command Prompt.
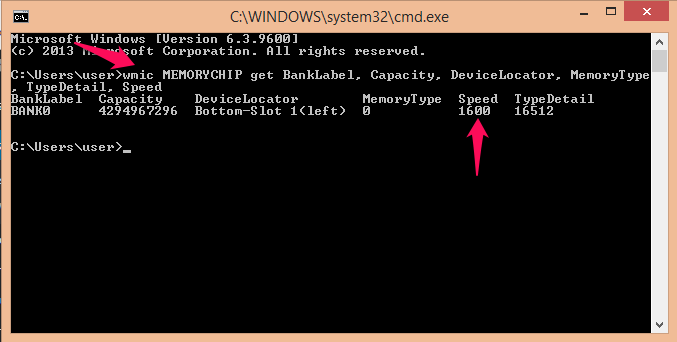
- Now there are two commands using which you can get all the information about the system and its storage. The first command is ‘wmic MEMORYCHIP get BankLabel, Capacity, DeviceLocator, MemoryType, TypeDetail, Speed‘. Type it without the quotes or copy-paste in CMD and hit Enter. Now you will be able to see the details of the RAM with the Speed or frequency i.e 1600 MHz.
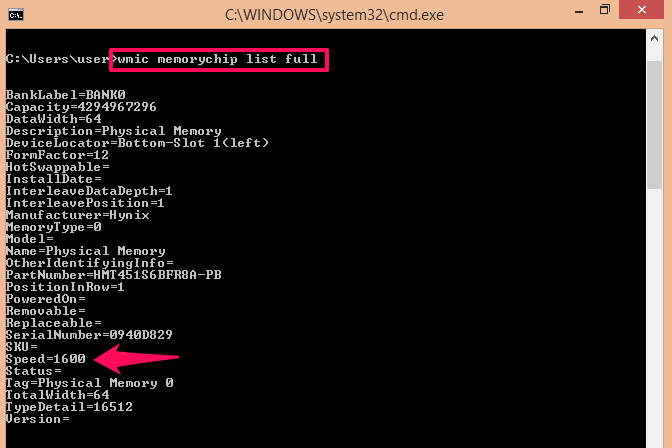
- The second command is ‘wmic memorychip list full‘.Type it in the command prompt without the quotes and hit Enter.
- Hit enter to open a list showing the information of the RAM on the system. Somewhere at the bottom of this list, you will be able to see the frequency i.e. Speed of the RAM.
- If you want to know only the total amount of available RAM, you need to type ‘systeminfo | findstr /C:”Total Physical Memory”‘ (without the single quotes).This will output the Total Physical Memory.
- If you would like to see the information about the available amount of RAM out of the total physical memory, type: ‘systeminfo |find “Available Physical Memory”‘ (without the single quotes).This will output the Available Physical Memory.
Method 2: Task Manager
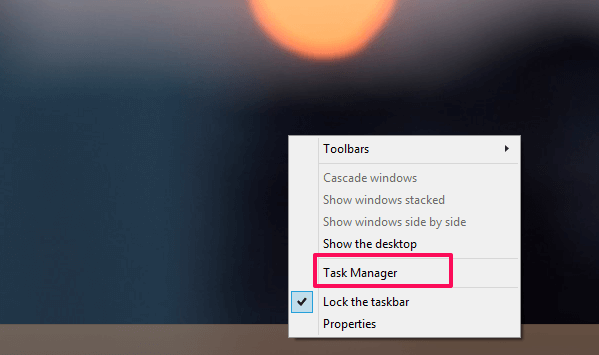
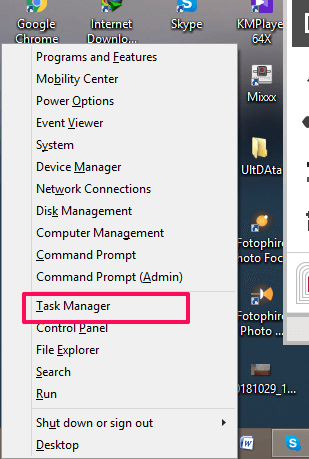
- To open the Task Manager, you can use two methods. Either you can do a right-click on the taskbar and from the menu select Task Manager. Or press Windows+X key together and from the menu that appears select Task Manager.
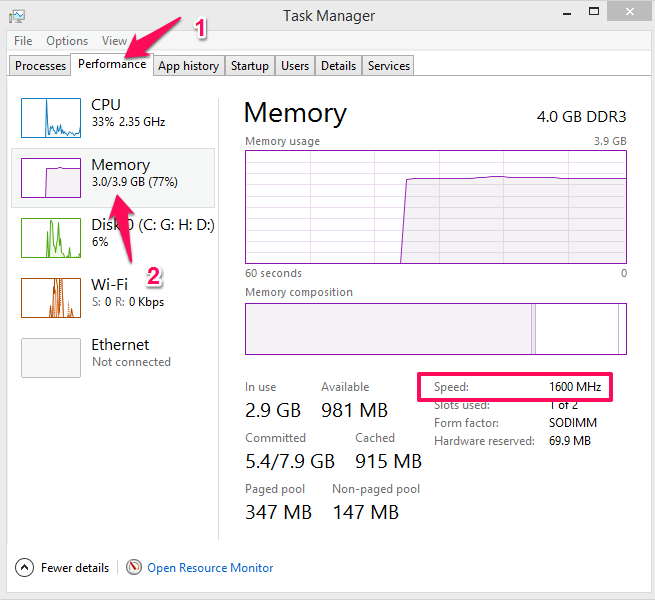
- After the Task Manager is opened, head over to the Performance tab as shown in the image below. In this performance tab, on the left side panel, you will see various storage options, from there select Memory option. Once you select it, on the right side you will be able to see the information regarding the performance of your RAM. Here you will be able to see the Speed of the RAM which is its frequency and in our case, it is 1600 MHz.
Check RAM And Its Speed On macOS
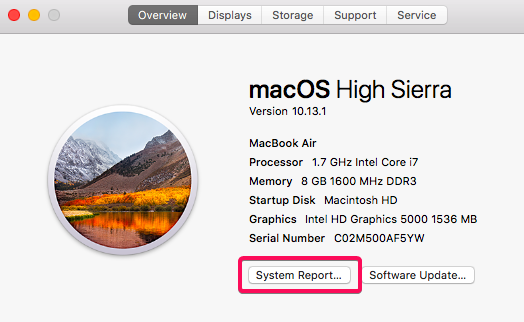
Here’s how you can check the RAM and its speed on macOS:
Main Method
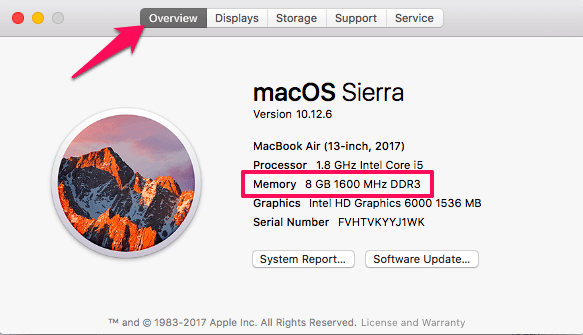
Just beside the Memory, you will be able to see the RAM storage and its speed or the frequency in MHz. In this case, it is 1600 MHz.
Get More Info
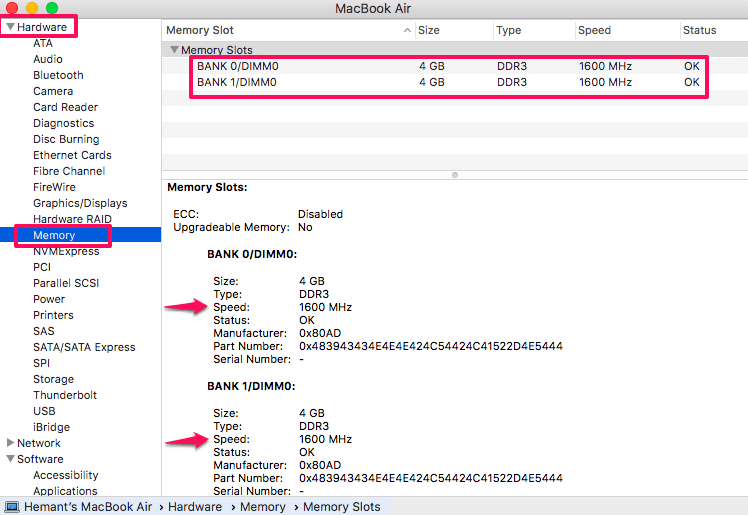
If you wish to get more about RAM and RAM speed on your Mac, you can also go to the System Report presented in the dialog we talked about above: In the report, under the Hardware option, look for Memory and select it. As you will select Memory, on the right side of this panel, you will be able to see extra RAM information including the frequency speed in MHz. It will also show you all the RAM storage that is available in your macOS and its speed on a similar screen. That’s it.
Wrapping Up
So these were some of the easiest methods to check the frequency of RAM, no matter what version of Windows you have or whether you use Mac. And the best thing is that you don’t need to do download or install any third-party application or software. Go check it out and share the results with us in the comments section below.
