So, if you’re someone who is facing this same kind of problem, then you’re at the right place. Because we are going to tell you how you can allow a program through the firewall on both Windows 7 and 10. Also Read: How To Force Public WiFi Login Page On Windows And Mac
Allow A Program Through Windows Firewall – Windows 7, 10
Changing Windows firewall settings to enable a program to run is really easy and it doesn’t take much time. The steps are exactly the same for both Windows 7 and 10. So, you can follow these steps on any of the platforms.
1 Allow A Program Through Windows Firewall – Windows 7, 101.1 Add Exceptions To Windows Firewall1.2 Wrapping Up
- First, go to the Control Panel and open the Windows Firewall settings.
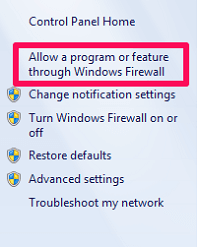
Note: You can also search for Windows Firewall in the start menu search box. 2. Now, on the top left corner of the screen, you’ll see the ‘Allow a program or feature through Windows Firewall’ option. Click on it.
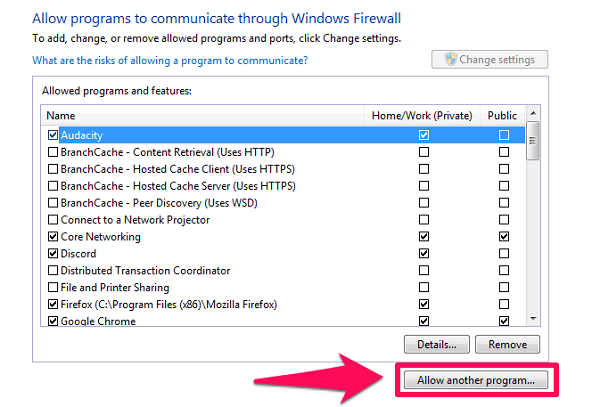
- In the next window, you’ll see the list of all the programs installed on your computer. The tick in the checkbox means the program is allowed through the firewall and vice versa. Now, just check the box of the desired program if it is deselected.
Note: If the programs in the list are non-clickable or greyed out, then click on the ‘Change Settings’ option to be able to make the changes. Also, based on your settings, it may ask your Microsoft username and password after you click on that option.
If you don’t see your program on the given list, then click on the ‘Allow another program…’ option.
A new window will open up with a list of additional programs, just select the desired program from the list. You can also search for it by clicking on the ‘Browse…’ option if it isn’t on the list. After you’re done selecting the program, just click on the ‘Add’ option and then perform the third step.
Finally, just click on the OK button at the bottom of the screen to save the changes. That’s it. You’ve successfully allowed the program through the Windows firewall. Now, hopefully, that program will work absolutely fine.
Add Exceptions To Windows Firewall
If you’re someone who wants to disallow all the apps through the firewall except a few exceptions, or the other way around, then you should very well know how to add exceptions to the firewall. And like before, the steps are similar for both Windows 7 and 10.
First, go to ‘Windows Firewall’ settings in the Control Panel.
Now, select ‘Advanced Settings’ from the list of options on the left side of the screen.
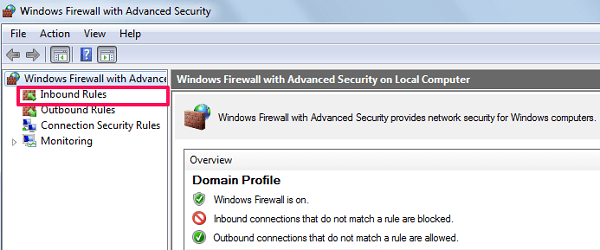
Next, click on the ‘Inbound Rules’ option on the upper left corner of the window.
After that, you’ll see the ‘New Rule…’ option on the upper right corner of the screen. Click on it.
On the next screen, select the ‘Program’ option and click on Next.
Now, select the ‘This Program path’ option and browse for the program you want to add as an exception. After selecting the program, click on Next.
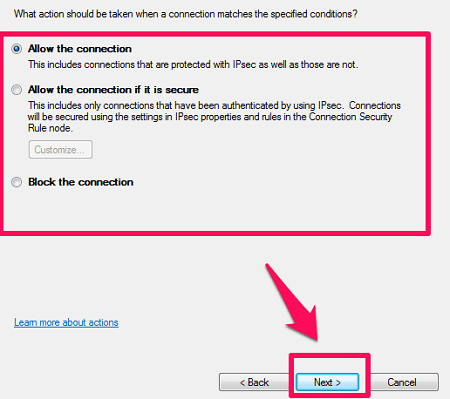
Select the action you want to take with the program and then again click on Next.
Finally, select the network type under which you want this rule to work.
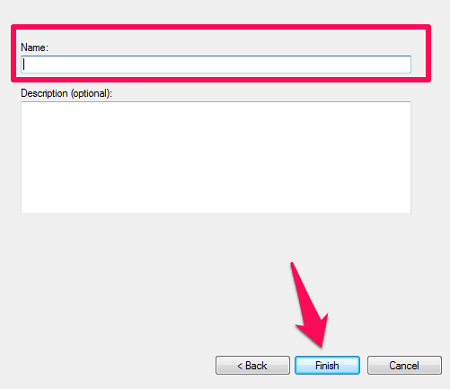
Just give a name to the rule you’ve just created and click on Finish.
So, now you’ve added an exception to the Windows Firewall with a rule of your choice. It wasn’t that hard afterall, was it? Also Read: How To Fix The Site’s Security Certificate Is Not Trusted?
Wrapping Up
If you’ve read the entire article, then now you very well know how you can allow a program through Windows firewall. And as a bonus, you also learned how you can add an exception to the firewall settings. We hope by performing either of the methods, you were able to get your thing done. If not then feel free to ask your query in the comment section below.

