Recommended: How To Open PDF Without Adobe Reader
Add Date And Timestamp To PDF Files
We have mentioned two software for this purpose. Both of them are available for Windows as well as Mac.
1 Add Date And Timestamp To PDF Files1.1 Using Foxit Reader1.2 Customizing Timestamp With Foxit1.3 Add Timestamp To A PDF Using Adobe Reader1.4 Conclusion
Using Foxit Reader
Foxit Reader is a hub for all your PDF related work. Be it opening of PDF files, any type of editing work, or simply adding of timestamp, it is capable of doing all the things with a swift. You can download it from their official site.
Open Foxit reader on your device and click on Open File option.
Now select the PDF file to which you want to add the timestamp and click on Open.
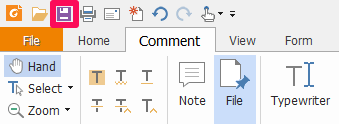
After the desired PDF file is properly opened on the device, click on the Comment tab available at the top-left of the screen.
Under Comment, locate and click on the Stamp option.
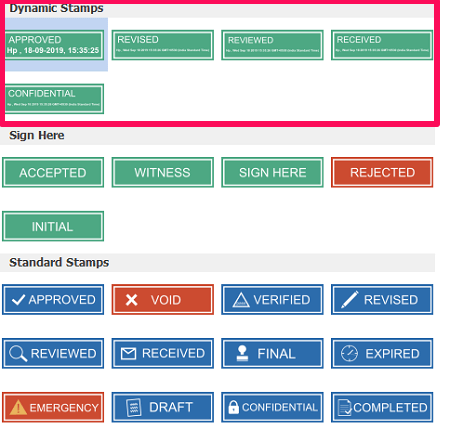
Right after clicking, you will see various kinds of stamps available. All the timestamps are located under the Dynamic Stamps category.
After you found the stamp you were looking for, simply click on it to select it.
Once selected, that stamp will get picked up by the cursor of your mouse. Now hover the stamp to the desired place on your PDF file and simply click on that place to drop your stamp there.
Finally, click on the save icon at the top-right.
Now you have your PDF file with an attractive date and timestamp attached to it. You can view it locally on your device anytime you want.
Customizing Timestamp With Foxit
Foxit has provided stamps for almost every office situation. Be it cancel stamps, approved stamps, timestamp, verified, revised or rejected, you will find the stamps for every possible event. But it doesn’t matter how much variety you have, the fun of customizing your own stamp is completely different and Foxit has made it possible.
Firstly, fire up the Foxit app and open a PDF file using the same steps.
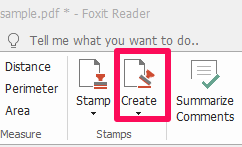
Under Comment, head towards the Create option, and select it.
Now click on the Create Custom Dynamic Stamp. A window will appear using which you can create your stamp now.
Under Stamp Template select the shape that you want your stamp to have and under the Category, give a perfect name to your stamp.
Now select the font of the text that will appear in your stamp by clicking on the Font option. Click on the drop-down menu in front of Stamp Text and select the <date and time>.
Similarly set the Color and Font Size and click on ADD. A Stamp with date and time will appear on the screen now. Drag and drop it in the selected frame. Change the stamp size if you want and finally click on OK.
The stamp is ready to be used now. Head towards the Stamp option to view your customized stamp.
Add Timestamp To A PDF Using Adobe Reader
Note: Make sure you have the latest version of Adobe Reader. Adobe Reader is the most renowned software for managing PDF files. So it is obvious that you are going to find an option to add a stamp using it. And where are you gonna find that option? Well, stick around with us to know that. In case you don’t have it on your computer then you can download Adobe Reader from their official website.
Launch Adobe Reader on your computer and open the PDF file by clicking on the File menu and selecting the Open… Then select the desired PDF file.
Now click on the Comment option and select the Stamp icon.
Hover on the Dynamic option and select any timestamp that you like.
Right after clicking on the stamp, a box will appear and ask you to put all the information about your stamp. Once the information is filled, click on Complete.
After filling up the information, the stamp you selected will get attached to the cursor of your mouse. Now drag it to the desired place and drop your stamp with a single click.
The stamp will be added to that position now. You can choose any stamp related to your PDF using the comment section anytime you want. Other than the timestamps, you can select other stamps by hovering to the Sign Here or Standard Business. (Shown in the screenshot attached with the 2nd step of Adobe Reader)
Changing Stamp Information In Adobe
The stamp information box will appear only when you are using the stamp for the first time. After that, the box will not appear again. So what if you get in a situation where it becomes compulsory to change that information? Well, then let me clear your doubts here.
Head towards the Comment menu again and select the stamp icon.
Now click on Show Stamps Palette.
In the box that just appeared, click on the drop-down menu and select the Dynamic option. All the timestamps will appear on the screen.
Right-click the stamp for which you want to change the information and click on Edit Identity…
Now as before, put the desired information and click on Complete. With this, the timestamp information will be changed. Using the same steps you will be able to alter the information anytime you need. Recommended: How To Change Color In PDF
Conclusion
Both the software offer us good quality stamps and that too free of cost. The only reason that Foxit reader has an upper hand is that unlike Adobe reader it allows us to customize our own date and timestamps so much easier. Otherwise, if you don’t feel any need for customizing stamps, both the software have enough timestamps for all your needs.


